


It is a universal fact, that a helpful and kind friend is destined to be doted on and cherished. Now imagine this ‘helpful friend’ lives inside your computer and is with you at every step of your technical journey. They are with you, present in your early morning shenanigans to your late night grinds, always next to you, to cater to your needs and put a smile on your face through their best efforts.
Well, most of y'all would’ve called my bluff, saying that a friend like this cannot be real, therefore, they cannot exist. A friend like this ought to be imaginary because no one can always be a 100% available for you. A train load of other problems and fallacies you can point out in this statement of mine. But, oh well, I never said that this friend of yours must be a human.
In this era of technological revolution, friendships come in various sizes and shapes, in new and unique forms. And today, I am going to show you how to build your own ‘friend’ who can be with you forever! ( but only on your PC )
Making your own OpenAI API key
Step -1: OpenAI API
To get started with building your own bot, you first have to log on to OpenAI API
Preferable login using a new account and use a phone number that you haven't used with OpenAI (you get a free $5 credit on registering with a new number)
Step - 2: API Keys
Next, navigate to your 'api-keys' manually or by clicking here, and do the following
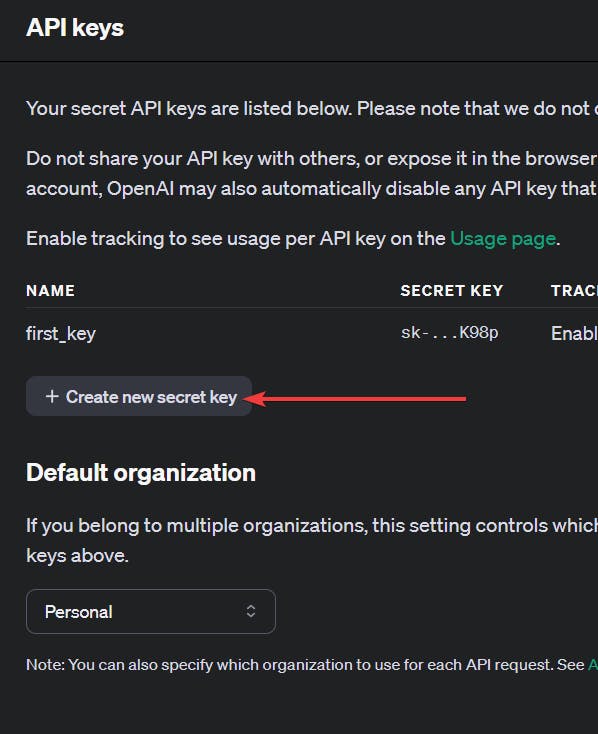

PS - It is not mandatory for you to fill the Name. Make sure the permissions is set to All.

NOTE - Remember to copy your API-key and store it somewhere securely. You will not be able to access it again.
We are done with fetching our API key. Next, let's jump into the coding part!
Setting up your own venv (optional)
Step - 1: Setting up your virtual environment
# pip install virtualenv
# python -m venv (path to venv) - comment for how the command structure must look like
python -m venv env
The above command creates a folder called env in your present working directory.
Step - 2: Running your venv
Open your terminal and run:
#Windows Terminal
./venv/Scripts/activate
#Run this command if you get an error in windows Terminal
#Set-ExecutionPolicy -ExecutionPolicy Unrestricted
Configuring your python
Step - 1: Installing Appropriate library
pip install python-dotenv openai
Step - 2: Setting up your .env to use python-dotenv
create a file named .env and put your OpenAI API key in it ( substitute the your_key with the API key you copied in step -2 above ) .
OPENAI_API_KEY='your_key'
Getting Started
Step - 1: Imports
Now create a file called main.py and add the following imports,
import openai
import os
from dotenv import load_dotenv

load_dotenv()
load_dotenv() function. This function loads all the variables declared in the .env file into your main.py which you can then initialize into your variablesStep - 2: Inside the main()
First we import the api key
openai_key = os.getenv("OPEN_AI_KEY")
Step -3: Instantiate the OpenAI client
myclient = openai.OpenAI(api_key=openai_key)
Step - 3: Hitting our API endpoint
The endpoint that we will be using in this example will be chat.completions endpoint. This endpoint, in simple words, tells your model to handle the user input as a form of chat. If multiple instances of conversation are present, then treat it as a history of current conversation.
response = myclient.chat.completions.create(
  model = "gpt-3.5-turbo-0125",
  messages = message,
  temperature = 0.6,
)
model : This specifies which model we want to use
message : This includes the fields we want to pass to our bot ( we are going to see what to put in this variable in the later parts )
temperature : This parameter determines how deterministic our model is. A value like 0.2 makes our model very deterministic, whilst values like 0.9 make our model very random. We are using 0.6 because we don't want our model to be too deterministic but also not too random.
Managing the reply
Your bot doesn't reply back in the same language that you talk to them in! They reply back in their own Language which looks something like this
Step - 1: Chat Completion Object
result = ChatCompletion(
          (id = "chatcmpl-95Eg3UNk22bjCyLcBZEJh24AlyqV1"),
          (choices = [
            Choice(
              (finish_reason = "stop"),
              (index = 0),
              (logprobs = None),
              (message = ChatCompletionMessage(
                (content = "Hello! I am a bot and I am talking to you"),
                (role = "assistant"),
                (function_call = None),
                (tool_calls = None),
              )),
            ),
          ]),
          (created = 1711035087),
          (model = "gpt-3.5-turbo-0125"),
          (object = "chat.completion"),
          (system_fingerprint = "fp_4f0b692a78"),
          (usage = CompletionUsage(
            (completion_tokens = 9),
            (prompt_tokens = 9),
            (total_tokens = 18),
          )),
        );
Step - 2: Extracting Results
As you can see, your bot replies in a mumbo-jumbo of sentences. To filter out its response, we will use
result = response.choices[0].message.content
Adding Personality to our Bot
Our chat completions endpoint accepts a list called messages, which contains all the parameters that are required by the model to do its magic. You can think of the messages as a means to talk to the bot. It serves as the mouth, ears, and mind of the bot.
The structure of messages will be looking something like this
[
{"role":"user / assistant / system",
"content" : "your content" },
{"role":"user / assistant / system",
"content" : "your content2" },
{"role":"user / assistant / system",
"content" : "your content3" },
]
As you see, the messages is nothing but an array of objects holding messages you want to pass to the bot.
The object consists of 2 key-pair values:
Role - This defines from which Point of View you want to give instructions to the model. You can think of it as an employee listening to their fellow employee ( basic day-to-day conversation ) and their employer ( work-related only ). There are three roles:
System - This role tells the bot how it must be configured. A programmer telling the program how to run
User - This is you. A curious mind
Assistant - This is the bot ( I know this might seem a little confusing, but the main po int of this is to show the bot how is it supposed to respond to certain questions where we think it might get confused. We won't be using this in this example, but maybe in some other blog)
Content - This holds the message you want to pass to the model
For this example, the structure of messages is going to look like something like this
prompt = """
How you want your chatbot to talk, greet, etc. Show your own creativity here.
"""

example_prompt = """ You are a prominent leader of a fake country called Eureka
You are a terrible leader with terrible schemes but you love to believe that you
are the best leader any country can have. Your common phrases are - "Ain't I great!" and
"I am the Ceaser of this era! HAHAHA". You love to boast about youself."""

message = [
  {
    role: "system",
    content: prompt,
  },
  { role: "user", content: "Hello!" },
];
Things you can ask your bot to do:
Greet in a very specific way
Use common phrases in every reply
Give them their own personalized backstory
And a lot more
Adding Chat Capability
Step - 1: Defining Utility Functions
# This function will be called when the user askes a prompt
def add_user_message(s: str) -> dict:
    temp = {"role": "user",
            "content": s}
    return temp

# This function will be called when the bot replies
def add_assistant_message(s: str) -> dict:
    temp = {"role": "assistant",
            "content": s}
    return temp

# This function will be called when the user wants to exit the chat
def exitChat(s: str) -> bool:
    if s.lower() == 'exit':
        exit_file = input("Do you want to exit the conversation? (yes/no): ")
        if exit_file.lower() == "yes" or exit_file.lower() == 'y':
            print("Goodbye!")
            return False
        else:
            return True
Step -2: Structuring the Program
reply = response.choices[0].message.content
print("Super Mario : ", reply)
# reply will store the reply of the bot and print it on the screen

#the bot message is appended to message, which stores message history
message.append(func.add_assistant_message(reply))

statement = input("User : ") #user prompt to ask question

#this if will check whether the user wants to exit the program or not.
# Tip - You can tell your bot to ask the user to say a specific keyword when they want to exit the program.
if not func.exitChat(statement,message):
    check = False
    break

# user message is appended to message, which is the message history
message.append(func.add_user_message(statement))
Conclusion ( with Overall Structure and DIY)
The overall structure (pseudocode) of the code must be something along the lines. Only the pseudocode is given because I want you all to try it yourself
-> Load in all your variables
-> Initialize your OPENAI client
-> while loop start
---> pass the initial message to openai api
---> return the reply and store it in history
---> print the reply and ask the user for the next prompt
---> check if the user wants to leave
------> if yes, quit
------> if no, store the user prompt in history and continue
Author's Note
This was a quick tutorial on how to make your own custom chatbot using OpenAI API! I hope the guide was easy to follow. If you would like me to explain any part of it in more detail, then please drop a comment in the comment section below.
Thank you for reading :)