


Demystifying the Linux Booting Process: A Comprehensive Guide
Taking Junior developers (and veteran developers) into the 'scary' world of Linux


In the huge world of technology that we live today, Linux is revered as one of, if not, THE holy grail for all those who call themselves a 'seasoned veteran'. These people have learned to skillfully navigate the ecosystem of Linux with grace and ease. For them, their CLIs being their main weapon to show their skills. But, for our poor junior developers, Linux is nothing short of a nightmare. Being entangled in not only the complexities of its system but also its complicated world of typos and constant errors. While watching their senior developers being the center of attraction in the party called “LINUX” they find themselves all huddled in a corner with their empty glasses.
In their sadness of not being able to understand anything, they fail to notice that their very seniors, at a point in their journey were also like them, all confused and lost. But how did they overcome this so-called - “Unfathomable wall of Linux”? They read and read and read and read. And that is what this article is here for.
Today we are going to look into How Linux System boot.
Level 0 - "The journey of system boot starts with YOU!"
You turn on the power to wake up your system from its deep slumber. The first stage of the boot has nothing to do with the Linux systems but rather with the hardware aspect of your PC. Your computer first loads in the firmware - BIOS ( Basic Input Output System) / UEFI ( Unified Extensible Firmware Interface ) ( UEFI is a newer standard that replaces the legacy BIOS, providing more features and benefits )
Level 1 - P.O.S.T
The first thing that is loaded in the firmware is the POST ( Power On Self Test ) which is provided by the firmware itself. POST in laymen’s terms means “checking the quality of the house before moving into the house”. The POST basically verifies the viability of all the hardware in your system to ensure the smooth and proper running of your applications and the OS.
The POST has a list of devices it must check before proceeding to the next stage. The contents of the list vary from system to system. If any specified hardware from the list is not detected, then an error message is displayed.
If no issues are found, then the POST issues a BIOS interrupt, INT 13H which locates the boot sectors (Master Boot Record) on any attached bootable devices for a valid boot record into the RAM and transfers control to the boot record loading into the RAM. MBR is typically in the 1st section of your attached hardware, in /dev/hda or dev/sda
Level 2 - BOOT LOADER
The boot loading is divided into 2 stages:
The first stage - Reading of boot record or Small SPL (Secondary Program Loader) - Its main purpose is to basically just loads the second stage.
The second stage - GRUB/GRUB2/LILO,etc. Its main purpose is to load in the next stage (kernel) and pass on the control to it.
The reading of boot record from the boot record located in MBR (Master Boot Record) is the first stage of the boot loader, the boot record in layman's terms “prepare the CPU” for the second stage of the boot loader by loading necessary Data Structures to switch it to Protected Mode. There are three boot loaders used by most Linux Distributions - GRUB, GRUB2, and LILO.
GRUB - GNU GRand Unified Bootloader predecessor of GRUB2. Config files must be created manually
GRUB2 - GNU GRand Unified Bootloader Version 2. Config files are created automatically by a scripting process
LILO - Linux Loader. Default Linux boot loader that replaced loadin as the default boot loader.
The second stage of the boot loader loads in the necessary data structures to load the kernel into the RAM.
The second stage of the bootloader gives the user the option to choose a single operating system from all the available operating systems present in the system. The boot loader looks for a configure file stored in the /boot directory. (e.g. for grub, the configuration file is stored in /boot/grub/grub.conf
This configure file is used to create the list of operating systems to boot in the GRUB’s menu interface.
Stage two of bootloader then loads the selected kernel into memory and passes over the control to the kernel.
Level 3 - KERNEL
The kernel is the core of the operating system. It has complete control over literally anything that happens in your system. Think of the kernel as the government of a country.
All kernels are self-extracting and are stored in compressed form to save space, located in the /boot directory.
The kernel extracts itself and then loads the mother of all processes, the process that is responsible for bringing the Linux host up to a state where work could be done - the init (the OG) / systemd (more powerful replacement of init), located in: /etc/inittab or /etc/systemd
The init process is responsible for managing many aspects of a running OS - mounting filesystems, starting and managing services, etc.
Level 4 - Init / Systemd
This is the OG parent process that runs over all other children processes. In layman's terms, when the kernel is launched by the bootloader, the kernel itself cannot launch all the processes, so it just starts the parent process or the first process that runs your system with the PID:1
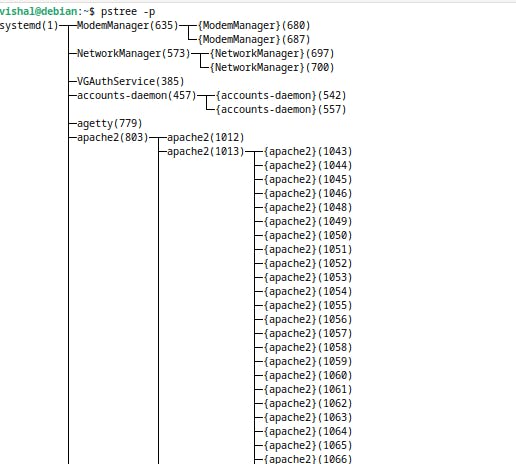
You can imagine the init process as the root node of a tree from which all other processes emerge. Therefore, it must persistently operate in the background for all the other processes to run. If killed, all processes die along with it.
You can visualize this by running a simple pstree -p command on Linux. (pstree command not found? Refer Below)
If the kernel cannot start the init process then a 'kernel panic' occurs!
So this was a detailed process of how exactly a Linux operating System boots. I hope with this new knowledge, the junior developers can finally get out of their corner and impress a person or two with their knowledge of "How the Linux Systems boot". Happy Learning!
pstree command not found?
pstree is part of the psmisc package which contains miscellaneous utilities that use the proc FS.
To install in Debian based systems
sudo apt-get -y install psmisc
To install in Fedora based systems
sudo yum -y install psmisc
Author's Note
I hope this article was useful! If you would like me to explain the init process in more detail, then please drop a comment in the comment section.
If you found any faults in my content then you could just drop me a quick DM.
Thank you for reading :)